Tag: SSIS

SSIS in Azure #3 – Schedule and Monitor SSIS Package Execution using ADF V2

*The source code created for this blog post can be found here.

In the previous blog posts in the SSIS in Azure series, we created a SSIS package to periodically ingests data from Azure SQL database to Azure Data Lake Store and deployed the package in the Azure-SSIS Integrated Runtime. Up to this point, we have achieved two goals in the SSIS in Azure series:

  • Using SSIS to move data between cloud storages
  • Host and run SSIS packages in cloud

The last goal we need to achieve is to schedule the execution of the SSIS package in cloud. Traditionally, we can schedule the SSIS package execution by creating a SQL Server Agent job. However, we can only do that through an on-premises SQL Server instance or provision a SQL Server vm in Azure. Thanks to the support of Stored Procedure activity in ADF, we can now schedule the SSIS package execution using a cloud-based ADF pipeline. This blog post will walk through the steps to achieve that.

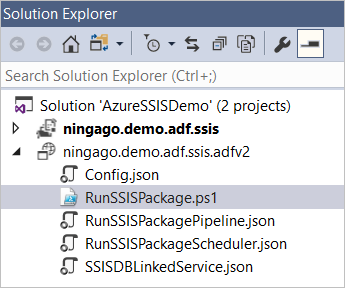
You can find the source code created for this blog post in my Github. The ningago.demo.adf.ssis.adfv2 project contains the json and powershell files to create the ADF pipeline.

4.PNG


The key to this solution is to call the sp_executesql stored procedure in the RunSSISPackagePipeline pipeline that execute the sql script for triggering the SSIS package execution. We can define a Stored Procedure activity in the pipeline to call the sp_executesql stored procedure and pass in the sql script for triggering the SSIS package execution as parameter.

5

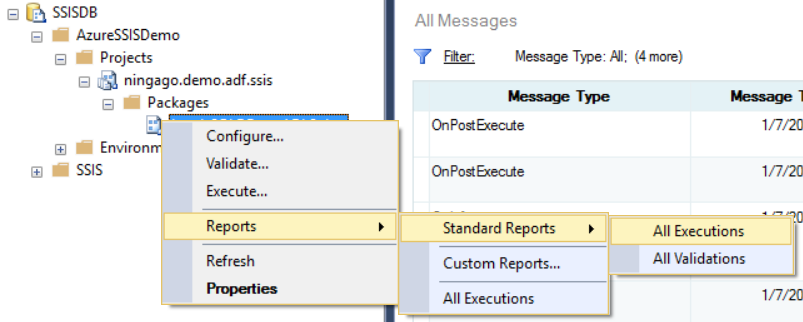
We don’t have to manually author the sql script from scratch, but instead we can generate the script using SSMS. First, we connect to the SSISDB catalog in our Azure-SSIS integrated runtime (please refer to SSIS in Azure #2 for how to do that), select the SSIS project or package we can execute, and click the Execute button to open the Execute Package dialog window.

6

On the Execute Package dialog window, we select the package to execute and also set a value (can be any value) for the package parameter (the reason is set any value to the parameter is to ensure the parameter setting statement will be generated in the sql script).

2

We then click the “Script” button on the top-left that will generate the sql script for executing the selected SSIS package.

3

We can then copy the script into the stored procedure activity defined in the RunSSISPackagePipeline pipeline.

5

As you may have noticed that the SSIS package parameter, DateScliceToLoad, has been manually set by us with a random value. The next step we need to take is to pass the date of pipeline run into the sql script in order to make the SSIS package only move the data in the give day. Firstly, we need to define the “scheduledRunTime” parameter in the RunSSISPipeline which will receive the scheduled pipeline run time from the pipeline trigger we will create later.

6.PNG

In the sql script we just generated to trigger SSIS package execution, we replace the random date we have manually set with the ADF expression which points to the scheduleRunTime parameter in the pipeline.

7.PNG

Next, we will need to create the trigger json file to schedule the execution of the pipeline. After we specify the pipeline to execute in the trigger file, we need to pass the scheduledTime of the trigger which is a system variable to the scheduledRunTime parameter defined in the pipeline.

{
  "properties": {
    "name": "RunSSISPackageScheduler",
    "type": "ScheduleTrigger",
    "typeProperties": {
      "recurrence": {
        "frequency": "Hour",
        "interval": 1,
        "startTime": "2018-01-07T00:00:00-22:00"
      }
    },
    "pipelines": [
      {
        "pipelineReference": {
          "type": "PipelineReference",
          "referenceName": "RunSSISPackagePipeline"
        },
        "parameters": {
          "scheduledRunTime": "@trigger().scheduledTime"
        }
      }
    ]
  }
}

After we have created the json files to define linked service, pipeline and the trigger, we need to deploy them into our data factory instance. As the V2 version of ADF does not support deployment through UI yet, we need to create a deployment scripts using PowerShell.

$DataFactoryName = "ninjago3843adf"
$ResourceGroupName = "SSIS"

Set-AzureRmDataFactoryV2LinkedService -DataFactoryName $DataFactoryName -ResourceGroupName $ResourceGroupName -Name "SSISDBLinkedService" -File ".\SSISDBLinkedService.json"
Set-AzureRmDataFactoryV2Pipeline -DataFactoryName $DataFactoryName -ResourceGroupName $ResourceGroupName -Name "RunSSISPackagePipeline" -DefinitionFile ".\RunSSISPackagePipeline.json"

Stop-AzureRmDataFactoryV2Trigger -ResourceGroupName $ResourceGroupName -DataFactoryName $DataFactoryName -Name "RunSSISPackageScheduler"
Set-AzureRmDataFactoryV2Trigger -ResourceGroupName $ResourceGroupName -DataFactoryName $DataFactoryName -Name "RunSSISPackageScheduler" -DefinitionFile ".\RunSSISPackageScheduler.json"
Start-AzureRmDataFactoryV2Trigger -ResourceGroupName $ResourceGroupName -DataFactoryName $DataFactoryName -Name "RunSSISPackageScheduler"

After the pipeline is deployed and scheduled by the trigger, the pipeline will execute our SSIS package based on the schedule.

8.PNG


SSIS in Azure #2 – Deploy SSIS Packages to Azure-SSIS Integration Runtime in ADF V2

In the first blog post of the SSIS in Azure series, I gave a demonstration on how to create SSIS packages to move data in cloud, using a common use case that periodically ingests data from Azure SQL database to Azure Data Lake Store.  In the pre-ADF V2 era, we can only deploy SSIS packages in on-premises SQL Servers or SQL Servers in Azure VM. Thanks to the Azure-SSIS integration runtime that is available for public preview in Azure Data Factory V2, we can now directly deploy and execute our SSIS packages in Azure without needing to provision and manage an Azure SQL Server VM (One thing to note, under the hood, Azure-SSIS integrated runtime itself is a cluster of Azure VMs that are dedicated to run SSIS packages).

This blog post will walk through the steps to deploy, execute and monitor the SSIS package we have created in previous blog post in the Azure-SSIS integration runtime.

First of all, we need to have an Azure-SSIS integration runtime created in our Azure tenant. This can be achieved using the PowerShell scripts provided by Microsoft.

I have met an issue when running the scripts. Here is the hint in case you run into the same issue. If the Set-AzureRmDataFactoryV2 and the Set-AzureRmDataFactoryV2IntegrationRuntime cmdlet in the PowerShell scripts fail to execute and raise the “HTTP Status Code: NotFound” error even after you have installed the Azure PowerShell modules (we can see the AzureRM.DataFactoryV2 module is installed after checking the C:\Program Files\WindowsPowerShell\Modules folder), it may be caused by the incompatible versions between AzureRM modules. As the “Install-Module AzureRM -AllowClobber” cmdlet only installs the Azure modules that are not already installed in your computer, the Azure modules on which the AzureRM.DataFactoryV2 module is dependent are not updated. The simplest solution to this issue is to remove all AzureRM modules in the C:\Program Files\WindowsPowerShell\Modules folder and then run the Install-Module AzureRM -AllowClobber cmdlet.

After the PowerShell scripts is successfully run, an Azure Data Factory V2 instance and a SSISDB Azure SQL database are created in the resource group we specified in the scripts.

2

The SSISDB is the Azure-hosted SSIS catalog where you can deploy your SSIS packaged into. We can use SSMS to connect to the SSISDB. On the Connect to Server dialogue in the SSMS, we need to specify the Server name as the Azure SQL server where the SSISDB SQL database is hosted.

3

After we specified the server name and the login details, don’t click the Connect button to connect to the SQL Server, but instead click the Options button to open the Connection Properties tab. On the Connection Properties tab, set “Connect to database” field as SSISDB database. This settings will allow you to connect to the SSISDB SSIS catalog after clicked the Connect button.

4

5

We can deploy our SSIS package into the SSISdB catalog either by using Deploy Project option in SSMS

6

or using Deploy option in you SSIS SSDT project in Visual Studio.

7

Both options will launch the Integration Services Deployment Wizard dialog to guide us through the steps for the SSIS package deployment.

8

13

We can execute the deployed SSIS packages in SSMS by right-clicking a SSIS project or SSIS package to launch the Execute Package dialog. The SSIS package we have created to periodically load data from Azure SQL database to Azure Data Lake requires a DateSclieToLoad parameter passed in that specifies which day of data to move. We can manually set the value of this parameter in the Execute Package dialog.

9

We can also monitor the SSIS package executions in SSMS through the SSIS catalog reports.

14.PNG

1112

Up to this point, we have created the Azure-SSIS Integration Runtime and deployed our SSIS package into the runtime. We can execute the package and monitor the execution results manually in SSMS. In next blog post, I will walk through the steps to schedule the SSIS package execution using an ADF V2 pipeline.  The ADF V2 pipeline will be scheduled to execute every day. The date of the current pipeline execution will be passed into the SSIS package, and the SSIS package will move the data by the given date parameter.


SSIS in Azure #1 – Periodically Ingesting Data from SQL Database into Azure Data Lake using SSIS

*The source code created for this blog post is located here.

The low cost, schema-less and large column attributes of Azure Data Lake Store along with the large number of supported analytic engines (e.g., Azure Data Lake Analytics, Hive and Spark) makes it a prefect store-everything repository for enterprise data. We can offline the copies of business data from various LOB data sources into Azure Data Lake Store for all sorts of batch analysis.

Microsoft provides us with Azure Data Factory, the cloud-based ETL service in Azure Cortana Intelligence Suite, to support the data ingestion to Azure Data Lake Store. However, many data engineers working with Microsoft BI stack may prefer to use the SSIS, the tool they are familiar with and offers the easy-to-use visual editor and the rich collection of transformation components, instead of Azure Data Factory where they have to author the json files to define data source links, datasets, and pipelines (at least for Azure Data Factory V1. There will be a visual editor for Azure Data Factory V2 but not available yet).

Thanks to the Azure-SSIS integration runtime that is available for public preview in Azure Data Factory V2, we can now deploy and execute our SSIS packages in Azure that provides an alternative option for cloud-based ETL.

This blog post introduces how to move data in cloud using SSIS with an example for a common use case that periodically ingest data from SQL database to Azure Data Lake Store. There are two key requirements for this use case:

  • SSIS need to be able to connect to Azure SQL database and load the data into a csv file in a specified folder in Azure Data Lake Store
  • SSIS need to be able to periodically, incrementally load data from Azure SQL database into a csv file for that period. The csv files need to be organised in date hierarchy for  optimised performance of Azure Data Lake Store.

1t1

For the first requirement, we need to use the SSIS Feature Pack for Azure that is an SSIS extension to connect to Azure services, move data between Azure data sources or between on-premises data sources and Azure data sources. For the second requirement, we need to use a SSIS trick for dynamic attribute settings on data flow destination component. We will cover the details to fulfil those two requirements in the rest of the blog post.

Firstly, we need to install the SSIS Feature Pack for Azure to Visual Studio (the right version of SSDT should have been installed to the Visual Studio). We should be able to see the Azure connection components in the SSIS toolbox after the feature pack is installed.

1t1

Before starting to build the SSIS package, we need to create a Azure AD service principle as the service account for accessing the Azure Data Lake Store and assign the principle read/write permission to the folder in the Azure Data Lake Store where the output csv files will be stored.

We then create a SSIS project in SSDT and add a Data Flow Task.

2

Open the Data Flow tab, add an ADO NET source which will connect to the Azure SQL database where the data will be extracted from. In this example, we will use the AdventureWorks sample database as data source and transfer the sale orders data into Azure Data Lake Store. To extract the sale orders periodically, we first define two variables in the SSIS package, “StartDate” and “EndDate“. In this example, we want to load the sale orders at the daily interval. The SSIS package is expected to run at early morning every day to load data of the previous day. Therefore, the value of StartDate variable will be: DATEADD( “day”, -1, ( (DT_DATE)(DT_DBDATE)GETDATE())) and the value of EndDate will be: (DT_DATE)(DT_DBDATE)GETDATE().

3

Then we want to extract the sale order records with LastModified datatime between the StartDate and the EndDate. In this example, we first create a Stored Procedure uspGetSaleOrders in the source SQL Database that take the StartDate and EndDate as parameters and return the sale orders between the dates. In your environment, if you do not have access to create Stored Procedure in your data sources, you can create the sql scripts into a SSIS variable.

We then move to the Control Flow tab and open the properties panel of the data flow task and open the Expressions editor.

1t1.PNG

On the Expressions editor, we add an expression to dynamically set the SqlCommand property of the SQL database source as: “EXEC [dbo].[uspGetSaleOrders] @StartDate ='”+(DT_WSTR, 50)@[User::StartDate]+”‘, @EndDate = ‘”+(DT_WSTR, 50)@[User::EndDate]+”‘”. This command will exec the stored procedure we created earlier with the StartDate and EndDate variables passed in.

2.PNG

Now we have the data source setup and we can move to add and configure the Azure Data Lake Store Destination.

3.PNG

We add an Azure Data Lake Store Destination component in the Data Flow table and add a data flow from the SQL database source to the destination. On the Azure Data Lake store Destination Editor window, we need to create an connection manager to manage the connection (including the store location and the authentication) to the Azure Data Lake Store and specify the output file path and the format of the file. As we will output the file as csv format, we need to select the file format as Text and the column delimiter character as “,”.

4.PNG

The interesting part is on the File Path attribute. As we discussed earlier, we want to organise the files into the date hierarchy based on the modified date of the sale order records, so the file path will look like: “/{project folder}/{Year}/{Month}/{Day}/SaleOrders_{date string}.csv“.

To dynamically set the file path of Azure Data Lake Destination, we can add an expression in the parent Data Flow Task as we did for the SQLCommond attribute of the SQL database source.

2

We define the expression for the file path as:

/Samples/Demo/”+(DT_WSTR, 4)YEAR(@[User::EndDate]) +”/”+RIGHT(“0” + (DT_WSTR, 2) MONTH(@[User::EndDate]), 2) +”/”+RIGHT(“0″ + (DT_WSTR, 2) DAY(@[User::EndDate]), 2)+”/SaleOrders_” +(DT_WSTR, 4)YEAR(@[User::EndDate]) + RIGHT(“0” + (DT_WSTR, 2) MONTH(@[User::EndDate]), 2) + RIGHT(“0″ + (DT_WSTR, 2) DAY(@[User::EndDate]), 2)+”.csv

Now we have the Azure Data Lake Store Destination setup and the data flow is ready to run. We can test the data flow in SSDT. As the sample AdventureWork database does not contain sale order records in the period when the blog post is written. I manually set the StartDate and EndDate variables for a day when there are sale order records in the AdventureWork database for the test purpose.

2

1t1

Now we can see the data flow is working when running on our local machine through SSDT. The next blog post will provision the Azure-SSIS Integration Runtime and deploy and run the SSIS package in the cloud.

Using SSIS and Excel Services to Build a Lightweight Reporting Solution for SharePoint-Based Applications (Part 4)

Using SSIS and Excel Services to Build a Lightweight Reporting Solution for SharePoint-Based Applications (Part 4)

Continue reading “Using SSIS and Excel Services to Build a Lightweight Reporting Solution for SharePoint-Based Applications (Part 4)”

Using SSIS and Excel Services to Build a Lightweight Reporting Solution for SharePoint-Based Applications (Part 3)

Using SSIS and Excel Services to Build a Lightweight Reporting Solution for SharePoint-Based Applications (Part 3)

Continue reading “Using SSIS and Excel Services to Build a Lightweight Reporting Solution for SharePoint-Based Applications (Part 3)”

Using SSIS and Excel Services to Build a Lightweight Reporting Solution for SharePoint-Based Applications (Part 2)

Using SSIS and Excel Services to Build a Lightweight Reporting Solution for SharePoint-Based Applications (Part 2)

Continue reading “Using SSIS and Excel Services to Build a Lightweight Reporting Solution for SharePoint-Based Applications (Part 2)”