
Databricks is not cheap, especially when I need to use it for my personal R&D work (where unfortunately money has to be taken from my own pocket). Therefore, I have been developing in a dockerised Spark environment since a while ago and I found this way actually works well. Here I list the steps to set the environment up with VS code and Docker.
1. Setup VS code remote development in Docker containers
Please refer to this guide for setting up VS code remote development in Docker containers. In addition, the docker-compose needs to be installed as well.
2. Setup base Spark cluster docker images
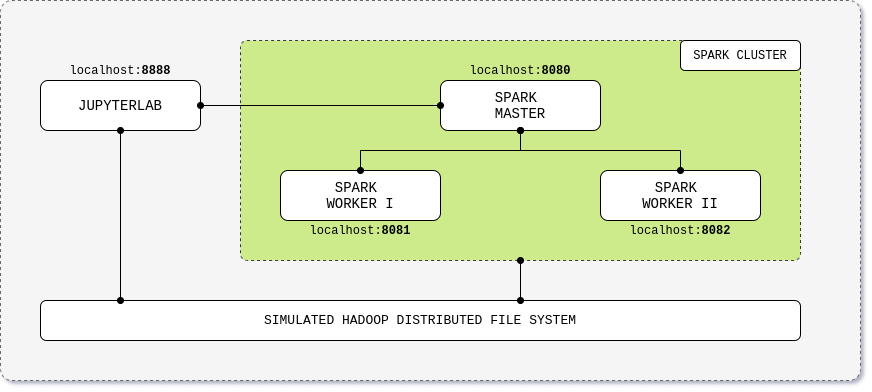
There are a number of open-source Spark cluster docker images available online that can be used as the base for our dev environment. After the hand-on tests, I found this one from André Perez suits best that consists of a Spark base image, Spark master image, Spark worker image, and a JupyterLab image. A simulated Hadoop distributed file system is also configured as the storage.
Apart from the Dockerfile image files, there are also a build.sh and a build.yml for configuring and building the images. In addition, a docker-compose file is provided to run up the cluster.
3. Customise the Spark cluster
We can then customise the Spark cluster to suit the requirements of our dev environment. To give an example, here is a list of customisations I made for my dev environment:
Add additional components/services required for the development, such as Microsoft SQL Server (docker image), Hadoop (docker image), OpenLDAP (docker image). You can add the build commends of those additional images to the build.sh and build.yml scripts to simplify the image build process. In addition, you need to add entries (corresponding to each image) in the docker-compose file.
Customise the JupyterLab container as the primary dev container. The Dockerfile of JupyterLab image already contains the installations of the necessary libraries for Spark development. You can install the additional libraries required for your development by extending this Dcokerfile. For example, I have added pyodbc to connect to mssql, SparkJDBC jar to connect to Spark Thrift Server, and the requirements.txt file containing all the dependency Python libraries I need.
COPY docker/jupyterlab/requirements.txt /opt/req/requirements.txt
COPY docker/jupyterlab/jdbc/SparkJDBC42.jar /opt/req/SparkJDBC42.jar

RUN curl https://packages.microsoft.com/keys/microsoft.asc | apt-key add - && \
    curl https://packages.microsoft.com/config/debian/9/prod.list > /etc/apt/sources.list.d/mssql-release.list && \
    apt-get update && \
    ACCEPT_EULA=Y apt-get -y install msodbcsql17 && \
    apt-get -y install unixodbc-dev && \
    pip3 install pyodbc && \
    pip3 install -r /opt/req/requirements.txt

ENV CLASSPATH /opt/jdbc/drivers/SparkJDBC42.jar
4. (Optional) Push images to Azure Container Registry
Please refer to this doc.
5. Build images
Extend the build.sh and build.yml to include the entries for the additional images you have added, and then run build.sh shell file.

6. Mapping source file folder to the working folder in dev container
Map your source file folder (in your local machine) to a folder in the dev Docker container (extended from the original jupyterlab container) by configuring “volumes” of the dev container entry in your docker-compose file.

7. Run docker-compose up to start containers

8. Attach VS code to the dev container
Start VS code window, open the “command palette”, and select “Remote-Containers: Attach to Running Container…”.

After the VS code window is attached to the dev container, install “Python Extension for Visual Studio Code” (Install inside the dev container, not the local host machine).
Open the working folder you mapped in step 6.

Then you have the dev environment in docker container where you can author, run, debug your code.

Here is the code for creating a SparkSession instance with the support of Delta Lake.

