Category: Azure Data Platform

How Azure Storage Cheats Over the CAP Theorem

Microsoft claims Azure Storage providing both high availability and strong consistency. It sounds good but obviously violates the CAP theorem as the ‘P’ (network partitioning) is not avoidable in the real world. In theory, you can only achieve either high availability or strong consistency in a distributed storage system. I have done a bit of research and found out the way how Azure Storage walks around the CAP theorem.

The figure below shows the high-level architecture of Azure Storage (from the SOSP paper authored by Microsoft product team)

Azure Storage stores data in Storage Stamps. Each Storage Stamp physically consists of a cluster of N racks of storage nodes. Each rack is built as a separate fault domain. There are three functional layers in each Storage Stamps, Front-Ends, Partition Layer and Stream Layer. The Stream Layer is where the data is stored and it can be thought of as a distributed file system layer with “Streams” can be understood as ordered lists of storage chunks, namely Extents. Extents are the units of replication that are distributed in different nodes in a storage stamp to support fault tolerance. Similar to Hadoop, the default replication policy in Azure Storage is to keep three replicas for each extent.

For Azure Storage to successfully cheat over the CAP theorem to provide high availability and strong consistency at the same time under the condition of network partitioning, the stream layer needs to be able to immediately response requests from client and the reads from any replica of the extent needs to return the same data. In the SOSP paper, Microsoft describes their solution implemented in Azure Storage as layered design with stream layer responsible for high availability and partition layer responsible for strong consistency. However, I have to admit I was confused with the explanations presented in the SOSP paper.

Instead, I found the core idea behind Azure Storage implementation is rather simple, i.e. offering strong consistency at the cost of higher latency, in the other words, enforcing data replication on the critical path of writing requests. The figure below shows the journey of a write request at the stream layer.

In a nutshell, extents are append-only and immutable. For an extent, every append is replicated three times across the extent replicas in a synchronous mode. A write request can only marked as success when all of the writes to all replicas are successful. Compared to asynchronous replication that is often used to offer eventual consistency, the synchronous replication will no doubt cause higher write latency. However, the append-only data model design should be able to compensate that.

It is worth to mention that the synchronous replication is only supported within a storage stamp. The inter-stamp replication still takes asynchronous approach. This design decision is understandable as having geo-replication on the synchronous critical write path can cause much worse write latency.

Why I Prefer Hand-Coded Transformations over ADF Mapping Data Flow

Firstly, I need to clarify that what I am discussing in this blog post is only with ADF Mapping Data Flow instead of the whole ADF service. I am not going to challenge ADF’s role as the superb orchestration service in the Azure data ecosystem. In fact, I love ADF. At the control flow level, it is neat, easy to use, and can be very flexible if you can be a little bit creative and imaginative. To avoid potential confusion, I define the “Hand-Coded Transformations” and the “ADF Mapping Data Flow” in this blog post as:

  • Hand-Coded Transformations – Programming transformation logics in code (pyspark, SQL, or others) and orchestrating the execution of the code using ADF data transformation activities in control flow, such as Databricks activities, Stored Procedure activity, and custom activity.
  • ADF Mapping Data Flow – Programming transformation logics using ADF Mapping Data Flow visual editor.

I totally understand why people prefer using a GUI-based, ready-to-use, code-free ETL tool to manually crafting data wrangling/transforming code. Intuitively, this is a no-brainer choice for people who view it from 10,000 feet. However, the devil is in the details. Here is the list of reasons why I prefer hand-coded transformation to ADF Mapping Data Flow:

  • One of the main drives for using ADF Mapping Data Flow is possibly the simplicity and flat learning curves. This may be true for the simple, generic transformation logic. However, for the more complicated, domain-specific requirements, ADF Mapping Data Flow does not have to be simpler than writing code in SQL or Python. They either require you to create complex data flow logic or you have to embed custom code in the data flow eventually. On the other hand, the hand-coded approach can be much simpler due to the flexibility of custom coding and the huge number of ready-to-use data wrangling/transformation libraries.
  • You may argue that the ADF Mapping Data Flow is for people who don’t know coding. However, ADF does not play the role of self-service ETL tools in the Azure data ecosystem (Power Query does). The target users of ADF should be data engineers or DataOps instead of data analysts. I understand some junior data engineers may resisting coding and shy away even without a try. The ADF Mapping Data Flow gives them the opportunity to escape and actually deprives their motivations of learning coding.
  • We can implement some validation logics in an ADF Mapping Data Flow, but that would be very high-level and simple. That does not allow us to conduct a comprehensive unit test on the transformation logics.
  • One of the main reasons I prefer coding over visual editor is the reusability, including reusability of domain-specific business logics and reusability of domain-independent non-functional logics, such as auditing, QA and exception handling. As the ADF Mapping Data Flow is working in the declarative paradigm, it is difficult to abstract and generalise the logic implemented in ADF Mapping Data Flow. On the other hand, abstraction and generalisation can be easily implemented with custom coding.
  • Custom coding allows you to build configurable and metadata-driven pipelines. A configurable, metadata-driven design can significantly improve the maintainability of your ADF pipelines. One of my previous blog posts describes some of my early designs of metadata-driven ADF pipelines with custom coding in SQL. If you are interested, you can find the blog post here.
  • The last but also the most important reason for me to favour hand-coded approach is the control and flexibility I can have to withstand the uncertainty in my projects. Just like any other IT project, it is not realistic to predict and control all the possible situations in a data engineering project. There are always some kinds of surprises popping up or user requirement changes. A code-free tool like ADF Mapping Data Flow hides the implementation under the hood and requires you to work in their way. In case an unpredicted situation happens and the code-free tool cannot handle it, it is expensive to change the tool at a late stage of a project. Compared to a code-free tool, hand-coding give you more flexibility and resilience to handle unpredicted situations.

Create Custom Partitioner for Spark Dataframe

Spark dataframe provides the repartition function to partition the dataframe by a specified column and/or a specified number of partitions. However, for some use cases, the repartition function doesn’t work in the way as required. For example, in the previous blog post, Handling Embarrassing Parallel Workload with PySpark Pandas UDF, we want to repartition the traveller dataframe so that the travellers from a travel group are placed into a same partition. As it takes a decent amount of time to run the group travel planning algorithm on each travel group,  we want the travel groups are evenly spread into different partitions so that the tasks running in parallel will take similar amount of time.

However, when running the repartition function on the traveller dataframe, the travel groups are not evenly distributed.

spark_04_02

spark_04_04

After printed the content of each partition, we can see that the travellers from same travel group are indeed placed into the same partition, however, some partitions are allocated with more travel groups while some other partitions are empty with no travel group allocated.

spark_04_05

The reason for that is due to the default partitioner, HashPartitioner, used by the dataframe. The HashPartitioner decides the partition through calculating the mod of the HashCode of the partition key (e.g., “GroupID” in our example) and the number of the partitions. Depending on the hashcode of the travel group ids, multiple travel groups may end up with same mod value.

spark_04_10

To enforce an evenly distributed partitions, we can create a custom partitioner to return an unique integer value for each travel group. For example, as the following snapshot shown, we can first define a dictionary to map the id of a travel group to the index of the travel group in a list with all the travel groups. In this way, the mapped index is unique for each travel group. We then create a custom partitioner to take the group id as parameter which will be used to get mapped index from the dictionary and the return the index as output of the custom partitioner. 

spark_04_06

Now we have the custom partitioner created, however, there is no function available for applying a custom partitioner on a dataframe. Instead, we can use the partitionBy function of the RDD associated with the dataframe, i.e. df.rdd.partitionBy({number of Partitions}, {custom partitioner}), to apply the custom partitioner. As the partitionBy function only supports key-value paired RDD, we need first map the data rows in the RDD to key-value pairs where key is the group id and value is the data row.

spark_04_09

We can then call the partitionBy function on the key-value paired RDD where the RDD is partitioned by the key (group id). Lastly, we need to convert the partitioned RDD back to a dataframe with createDataFrame function. Before converting the partitioned RDD, we need to map the key-value paired RDD to row-based RDD.

spark_04_07

After printed the content of the new RDD, we can see that the travel groups are now evenly distributed in the partitions.

spark_04_08

Configuration-Driven Azure Data Factory Pipelines

In this blog post, I will introduce two configuration-driven Azure Data Factory pipeline patterns I have used in my previous projects, including the Source-Sink pattern and the Key-Value pattern.

The Source-Sink pattern is primarily used for parameterising and configuring the data movement activities, with the source location and sink location of the data movement configured in a database table. In Azure Data Factory, we can use Copy activity to copy an data entity (database table or text-based file) from a location to another, and we need to create an ADF dataset for the source and an ADF dataset for the sink. It can easily turn into a nightmare when we have a large number of data entities to copy and we have to create a source dataset and a sink dataset for each data entity. With the Source-Sink pattern, we only need to create a generic ADF dataset for each data source type, and dynamically refer to the data entity for copy with the source and sink settings configured in a separate configuration database.

The Key-Value pattern is used for configuring the settings of activities in Azure Data Factory, such as the notebook file path of a Databricks Notebook activity or the url of a logic app Https event. Instead of hard-coding the settings in ADF pipeline itself, the Key-Value pattern allows to configure the activity settings in a database table and to load the settings and dynamically apply them to the ADF activities at runtime.

In the rest of this blog post, I will introduce the implementation of those two patterns in Azure Data Factory.

Source-Sink Pattern

To implement the Source-Sink pattern in Azure Data Factory, the following steps need to be followed:

  • Step 1 – create data movement source-sink configuration table
  • Step 2 – create generic source and sink datasets
  • Step 3 – use Lookup activity to fetch the source-sink settings of the data entities for copy from the configuration table
  • Step 4 – use ForEach activity to loop through the data entities for copy
  • Step 5 – add a generic Copy activity inner the ForEach activity

Step 1 – create data movement source-sink configuration table

Create a configuration database (an Azure SQL database will be a good option), and create a table with columns to define data movement category, location for source and location for sink.

ADF_04_001

Along with the configuration table, we need to create a stored procedure for the Lookup ADF activity to retrieve the source-sink settings of the data entities for specified copy category.

ADF_04_020

Step 2 – create generic source and sink datasets

Create generic source and sink datasets. To make the datasets generic, we need to create a number of dataset parameters to define the location of the table or file referred by the dataset. Those parameters will take the values fetched from the configuration database table at runtime.

ADF_04_005

On the Connection tab of the generic dataset, we need to specify the table name or file container/path/name using the dataset parameters we just defined.

ADF_04_006

Step 3 – use Lookup activity to fetch the source-sink settings 

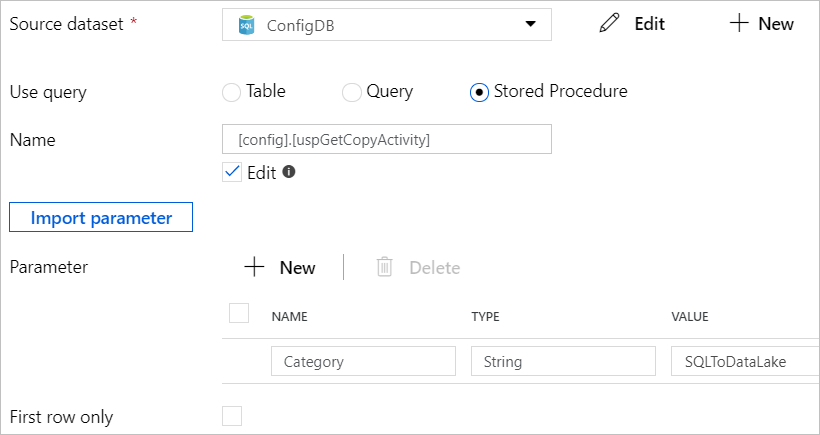
Add a Lookup activity and set to use the stored procedure we created earlier for retrieving the source-sink settings of all the data entities for copy in a specified category.

ADF_04_019ADF_04_007

The output of the Lookup activity will contains source-sink settings of all the data entities in the specified category defined in the configuration database table.

ADF_04_017

Step 4 – use ForEach activity to loop through the data entities for copy

Add and chain a ForEach activity after the Lookup activity, and set the Items property of the ForEach activity as the output of the Lookup activity, @activity(‘Lookup Configuration’).output.value, so that the ForEach activity will loop through the source-sink settings of all the data entities fetched from the configuration database table.

ADF_04_009

Step 5 – add a generic Copy activity inner the ForEach activity

Inner the ForEach activity, add the Copy activity with the Source and Sink pointing to the generic source dataset and sink dataset we created earlier and pass the corresponding source-sink settings of current data entity item, such as @item().Sink_Item for the file name of the sink.

ADF_04_010

At this point, the source-sink pattern is all set. When the pipeline runs, a copy channel is created and executed for each data entity defined in the configuration database table.

ADF_04_011

Key-Value Pattern

To implement the Key Value pattern in Azure Data Factory, the following steps need to be followed:

  • Step 1 – create activity settings key-value configuration table
  • Step 2 – create stored procedure to transform the key-value table
  • Step 3 – use Lookup activity to retrieve activity settings from configuration table
  • Step 4 – apply settings on ADF activities

Step 1 – create activity settings key-value configuration table

Create a database table with columns defining pipeline name, activity type, activity name, activity setting key, activity setting value.

ADF_04_012

Step 2 – create stored procedure to transform the key-value table 

The ADF Lookup activity is not working in the key-value type dataset. Therefore, we need to convert the key-value table into a single data row with column header as the activity setting key and the column value as the activity setting value.

ADF_04_013

We can use T-SQL PIVOT operator to convert the key-value table into the single row table. However, as the number of records in the key-value table is not fixed, we cannot specify the keys for pivot. Instead, we need to fetch the keys from the key-value table first and author the PIVOT operation in dynamical sql. The snapshot below shows the stored procedure I have created for convert the key-value table.

ADF_04_014

Step 3 – use Lookup activity to retrieve activity settings from configuration table

In the Azure Data Factory pipelines you are creating, at the start of the activities chain, Add a Lookup activity and use the stored procedure created earlier to retrieve the key-value table and convert it into the single row format to be readable for the Lookup activity.  On the Lookup activity, tick the ‘First row only’ on as the result of the Lookup activity will be the single row dataset.
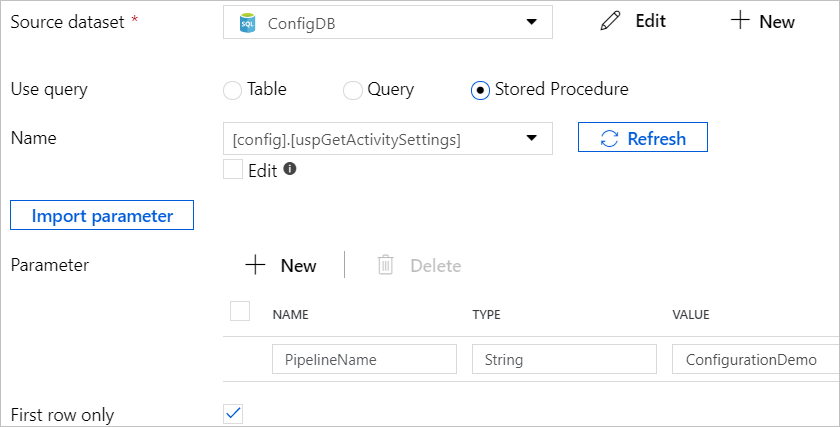
ADF_04_015

The snapshot below shows what the output of the Lookup activity looks like.

ADF_04_016

Step 4 – apply settings on ADF activities

From the output of the Lookup activity, the other ADF activities chained after can access the value of an activity setting as @activity(‘{lookup activity name}’).output.firstRow.{column name for the key}. 

ADF_04_018

Handling Embarrassing Parallel Workload with PySpark Pandas UDF

Introduction

In the previous post, I walked through the approach to handle embarrassing parallel workload with Databricks notebook workflows. However, as all the parallel workloads are running on a single node (the cluster driver), that approach is only able to scale up to a certain point depending on the capability of the driver vm and is not able to split workload into multiple worker nodes. In this blog post, I will walk through another approach to handle embarrassing parallel workload with Databricks Pandas UDF.

Embarrassing parallel workload refers to the type of problems that are easy to separate into parallel task with no dependency for communication between those parallel tasks. Embarrassing parallel workload normally calculates similar things many times with different groups of data or different sets of parameters. The calculation are independent of each other and each calculation takes a fair amount of time. The datasets involved in embarrassing can be big, but in most of use cases, the datasets are not at the “Big Data” scale.

The native parallelism mechanism of Apache Spark might not be an efficient way for the embarrassing parallel workload due to the overhead of serialization and inter-process communication.  In addition, many libraries commonly used in the Embarrassing Parallel use cases, such as numpy and scikit-learn, are not supported by PySpark. However, Pandas UDFs supported by PySpark can be a feasible way for embarrassing parallel workload.

Approach

Unlike the PySpark UDFs which operate row-at-a-time, grouped map Pandas UDFs operate in the split-apply-combine pattern where a Spark dataframe is split into groups based on the conditions specified in the groupBy operator and a user-defined Pandas UDF is applied to each group and the results from all groups are combined and returned as a new Spark dataframe. Embarrassing parallel workload fits into this pattern well. In this way, the calculation of an embarrassing parallel workload can be encapsulated into a Pandas UDF. The dataset involved in the embarrassing parallel workload is loaded into a PySpark dataframe and split into group and the calculation on each group of data is executed in the Pandas UDF with Spark tasks running on separate executors in parallel.

This blog post demonstrates the Pandas UDF approach with the sample example I have used in the previous blog post for explaining the approach for handling embarrassing parallel workload with Databricks notebook workflows.

The sample notebook I have created for this blog post can be found here in my Github repository. The snapshot below shows the core part of the notebook:

databricks_2_002

A Pandas UDF, “planGroupTravelling” (Line 6-12) is crated to execute the group travel planning optimisation algorithm from Toby Segaran’s “Collective Intelligence” book for one travel group.

The dataset of all travel groups used in this example is converted into a Spark dataframe where each row contains fields of travel group id, traveler name, and travel origin (Line 14). For this example, an utility function, “travelGroupsToDataframe“,  is created to covert the original dataset in Python dictionary format to a Spark dataframe (The code for the “travelGroupsToDataframe” function can be found in the sample notebook for this blog post here). The snapshot below shows the converted Spark dataframe, i.e. the input dataframe for the parallel workload.

databricks_2_004

The dataframe is split by travel group id and the “planGroupTraveling” Pandas UDF is applied to each group (Line 15). The results from each UDF, the optimised travelling arrangement for each traveler, are combined into a new Spark dataframe.

databricks_2_003

Conclusion

This blog post describes another approach for handling embarrassing parallel workload using PySpark Pandas UDFs. Grouped map Pandas UDFs operate in the split-apply-combine pattern which distributes calculation logic written in native Python to separate executors and run in parallel. This pattern fits well with embarrassing parallel workload.

Handling Embarrassing Parallel Workload with Databricks Notebook Workflows

Introduction

Embarrassing Parallel refers to the problem where little or no effort is needed to separate the problem into parallel tasks, and there is no dependency for communication needed between the parallel tasks. Embarrassing parallel problem is very common with some typical examples like group-by analyses, simulations, optimisations, cross-validations or feature selections. Normally, an Embarrassing Parallel workload has the following characteristics:

  • Calculate similar things many times with different groups of data or different parameter sets
  • Calculation are independent of each other
  • Each calculation take a fair amount of time
  • The datasets involved in the calculation can be big, but in most of use cases, the datasets are not at  the “Big Data” scale.

The native parallelism mechanism of Apache Spark might not be an efficient way for the Embarrassing Parallel workload due to the overhead of serialization and inter-process communication, especially when the dataset is not big but the calculation is complex. Based on benchmark tests conducted by Dorian Beganovic, Spark performed much more poorly on small or medium size of datasets compared to Pandas running on single machine. Dorian suggested a >500GB mark as the suitable size for spark. In addition, many libraries commonly used in the Embarrassing Parallel use cases, such as numpy and scikit-learn, are not supported by PySpark.

One alternative solution is to take advantage of Databricks Notebook workflows to handle the Embarrassing Parallel workloads. Basically, one generic Databricks Notebook is created to run the calculation for one parallel task against one partition of the entire dataset or one set of parameters. The partition of the dataset or set of parameters are specified by Notebook parameters. In this blog post, these generic Databricks notebooks to run the calculation logic in parallel are referred as Parallel Notebooks.  The Parallel Notebooks are triggered by another Databricks Notebook, which is named as Master Notebook in this blog post. The Master Notebook encapsulates the logic for partitioning the dataset or creating the parameters set and launches the parallel notebooks to execute the calculation logic against the partitioned dataset or parameter set in parallel.

Approach

This blog post walks through the detailed steps to handle Embarrassing Parallel workloads using Databricks Notebook workflows. You can find the sample Databricks notebooks I created for this blog post here.

Baseline Test

We first take a baseline test to run some calculation logic workload in sequence, and then we create notebook workflows to run the workload in parallel to compare the total execution time.

For the calculation task, I will use the group travel planning optimisation example from Toby Segaran’s “Collective Intelligence” book. You can find the Python code encapsulated the optimisation algorithms from here. In this baseline test, I have created eight travel groups and stored them into a dictionary with the dictionary key as the group ID and the dictionary value as the travel group data. A for loop is crated to loop through each travel group and run the optimisation algorithm for each group one by one. The result shows that it took 4.99 minutes to run through all eight groups.

ADB_1_001

After we have the execution time for the sequential workload, we can start to handle the workload in parallel with Databricks notebook workflows to see if the total execution time can be reduced with parallel approach.

Parallel Notebook

We first create the parallel notebook and include the optimisation algorithm code snippet from  Toby Segaran’s “Collective Intelligence” book which will be used for finding the optimised  travel plan for a travel group.

We then create a “groupIDs” parameter which takes the ids of the travel groups to process in this parallel task.

ADB_1_009

The value of the “groupIDs”  parameter is used to retrieve the data of the specified travel groups. In this example, for the simplicity, I just used a Python dictionary to store the data in the file. In real-world scenarios, the data is more likely stored externally such as a database or data lake. In the generic notebook, the optimisation algorithm is only run on the travel groups specified by the parameters.

ADB_1_004

Master Notebook

We then create the Master notebook to partition the travel groups and launch the parallel notebooks. I have written a GroupTravelPlanning class which encapsulates the travel group partition function and the function to launch multiple notebooks in parallel using the built-in multiprocessing library of Python.

##################################################################################
# The master class that partitions the travel groups and trigger the sub notebooks 
# execution for each partition in parallel
##################################################################################
class GroupTravelPlanning:
  
  def __init__(self, partitionNum, travelGroups):
    self.partitionNum = partitionNum
    self.travelGroups = travelGroups
    self.groupPartitionList = self.PartitionTravelGroups()
  
  #Partition travel groups
  def PartitionTravelGroups(self):

    #Initialise a dictionary for hosting the partitions of travel groups
    partitions={}
    for partitionID in range(0, self.partitionNum):
      partitions[partitionID]=[]
      
    #Partition the travel groups 
    for index, groupID in enumerate(self.travelGroups.keys(), start=0):
      partitionID = index % self.partitionNum
      partitions[partitionID].append(groupID)
  
    #Convert the travel groups partition dictionary into an list of travel 
    #group strings, such as ['Group-1,Group-2', 'Group-3,Group4',...] 
    groupPartitionList = []
    for group in partitions.values():
      groupPartition = ','.join(group)
      groupPartitionList.append(groupPartition)
    return groupPartitionList
  
  #Run group travel planning sub-notebooks in parallel
  def RunGroupTravelPlanningNotebooks(self):
    from multiprocessing.pool import ThreadPool
    pool = ThreadPool(self.partitionNum)
    
    pool.map(
       lambda groupIDs: dbutils.notebook.run(
          '/Users/malinxiao@hotmail.com/Group Travel/GroupTravelPlanning_Parallel',
           timeout_seconds=0,
           arguments = {"groupIDs":groupIDs}),
       self.groupPartitionList)

You can find more details for using Python multiprocessing library for concurrent Databricks notebook workflows from this doc. Basically, a thread pool is crated with the number of threads to be same as the number of partition of travel groups to process so that all the partitions of travel groups can be processed at the same time and no waiting queue.

ADB_1_007

Apart from the GroupTravelPlanning class, we also need to add the code to create an instance of the GroupTravelPlanning class in the Master notebook and trigger the main method.

ADB_1_011

After the Master notebook starts to run, the list of sub notebooks (from the generic notebook template with the partitioned travel group ids as parameter) is launched.

ADB_1_002

The result shows that the total time for running through the eight test travel groups in four groups in parallel took 1.63 minutes compared to 4.99 minutes for running in sequence.

ADB_1_001

Limitations

This blog post walks through an approach to handle Embarrassing Parallel workload with Databricks notebook workflows. This approach is logically simple to understand and is easy to control the parallelism with built-in Python multiprocessing package.  However, the limitation of this approach is that all the parallel tasks are running on a single machine (the cluster driver) instead of being distributed to worker nodes. That limits the solution only being able to scale up to a certain point although the maximum VM supported by Databricks at the time when the blog post was written can reach to 80 cores/640 GB (Standard_L80s_V2). To support Embarrassing Parallel workload across multiple nodes,  the alternative approaches can use Pandas UDF for PySpark. I will introduce the Pandas UDF approach in next blog post.